
Golpe Definitivo
Save it for stage 6. Cast it right on the boss once it's inside your towers' range (cooldown 49 s).
Arena guides › Arena 3
The armor mix is even (4 magic, 4 physical, 5 none). Physical covers both bosses: Krum'Thak has magic armor and Gul'Thak has none. Fuerte de Ballesteros kills them; Gema and Mago Arcano handle Ogro, Orco and Campeón Orco, which have physical armor. Rivals can also send you Globos Goblin (a flying bomber), so every tower in this deck can shoot air.
 Krum'ThakMagic armorHit with physical · Ref. HP 40,000
 Gul'ThakNo armorHit with anything · Ref. HP 37,000
Enemy armor in this arena:
4 magic armor 4 physical armor 5 no armor
| Tower | Code | Spots | Role | Why |
|---|---|---|---|---|
 Fuerte de Ballesteros Fuerte de Ballesteros | FB | ×3 | Boss killer | Fast physical shots (0.3 s at NIV3) that hit fliers. They kill Krum'Thak or Gul'Thak at the exit. Buy Aluvión at NIV3: 20 hits of 471–538 every 15 s. |
 Gema Llameante Gema Llameante | GL | ×2 | Main damage | Magic beam for Ogro, Orco, Campeón Orco and Guerrero Goblin, which all have physical armor. |
 Mago Arcano Mago Arcano | MA | ×2 | Boss killer | Magic burst: Rayo de la Muerte deletes an Ogro (11,250 reference HP) in one or two hits. Also hits fliers. |
 Dominios del Genio Dominios del Genio | DG | ×1 | Support | Magic area damage, +26% gold from Peaje del Genio, and Maravillas Milagrosas hexes the opponent's units and towers. |
Boss killers go next to the exit. Main damage goes where the path passes on several sides. Support goes in the most central spot. Early towers go near the gates.
| Tower | Buy first | Then | Why |
|---|---|---|---|
| Fuerte de Ballesteros | Aluvión (220) | Vista Corta (180) | Aluvión fires 20 hits of 471–538 physical damage every 15 s, about 10,000 damage in one burst. That's your best boss killer for magic-armored bosses. Vista Corta sends hawks to the same spot on your opponent's side and cuts the range of the tower built there by 17% and its damage by 20%. Buy it second, or first if your opponent has a dangerous tower on that spot. |
| Gema Llameante | Llamado Eldritch (180) | Gema de Multiplicación (210) | Eldritch blocks the path and does true damage. Multiplicación splits the beam across 2 targets, which is worse against a lone boss and better against swarms. In Arena 15, buy Multiplicación first. |
| Mago Arcano | Rayo de la Muerte (168) | Teletransporte (190) | Rayo de la Muerte is the boss killer (5,506–6,730). Teletransporte sends 4 enemies back 1.7 tiles. |
| Dominios del Genio | Deseo de Brasas (150) | Hola, Adiós (170) | Brasas adds true-damage burn to every hit. Hola, Adiós makes your opponent's fastest enemies invisible to their towers. |
Save it for stage 6. Cast it right on the boss once it's inside your towers' range (cooldown 49 s).

Aim it down the longest straight stretch where enemies bunch up. Everything it kills becomes a fire elemental on your opponent's side. Use it in the stage 4–5 rush and keep it ready for the boss escort.

Cast it on Krum'Thak or the Ogro pack to cut their armor or magic resistance by 76% for 14 s, then let your towers burst them. The short 18 s cooldown means you can use it every wave.

Fuerza de Aguja gives every tower +3% damage, and Depleción de invasores cuts enemy magic armor by 5%, which helps your Gema towers against Krum'Thak, Mago Goblin and Chamán Orco. He flies.
Where to keep him and when to move: Park him where the two entry routes meet. Nova de Enfermedad (2,048–2,341 area damage, 23 s cooldown) is his big hit, so drop it on goblin and orc packs, especially the ones with Gul'Thak or Chamán Orco healing them. Nube de Plaga slows by 30%, so use it right in front of your Fuerte de Ballesteros. His Skeletal Wyverns appear from your kills and attack your opponent's path on their own.
Once per stage you pick 1 of 3 boosters. Commit to 1–2 of them so they level up. All boosters of this arena

A flying bomber: great against rivals who rely on soldiers, Gusano or Mecha.

Magic armor, and its lightning stuns your rival's soldiers and hero in an area.

High-health spider with magic armor that keeps spawning bigger spiderlings: good against physical-heavy rivals.
What your rival can send you: Your rival's Globos Goblin flies: keep Fuerte de Ballesteros and Gema near the exit. Only 3 of the 11 boosters in this arena were screenshotted.
Each picture shows the card and spot number. G is a gate where enemies come in, X is the exit, C is a rock mound that may be a tunnel. Tap a picture to open it full size. Jump to: Layout 1 · Layout 2 · Layout 3 · Layout 4 · Layout 5
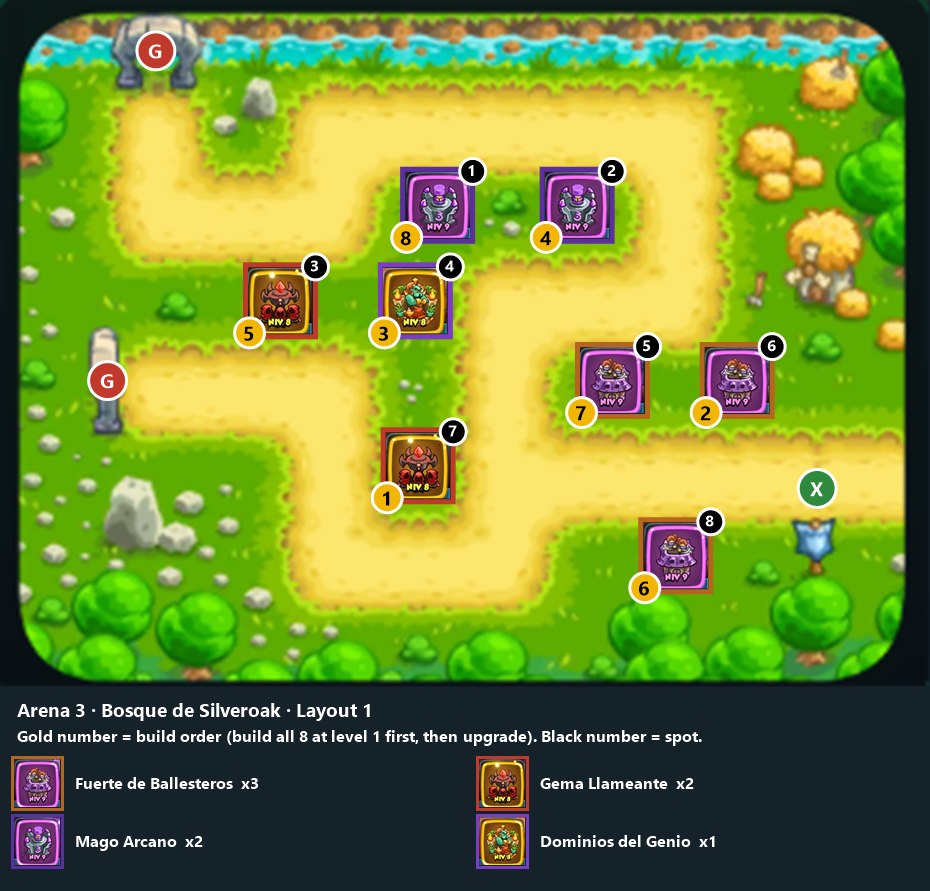 Mago ArcanoMago ArcanoGema LlameanteDominios del GenioFuerte de BallesterosFuerte de BallesterosGema LlameanteFuerte de Ballesteros
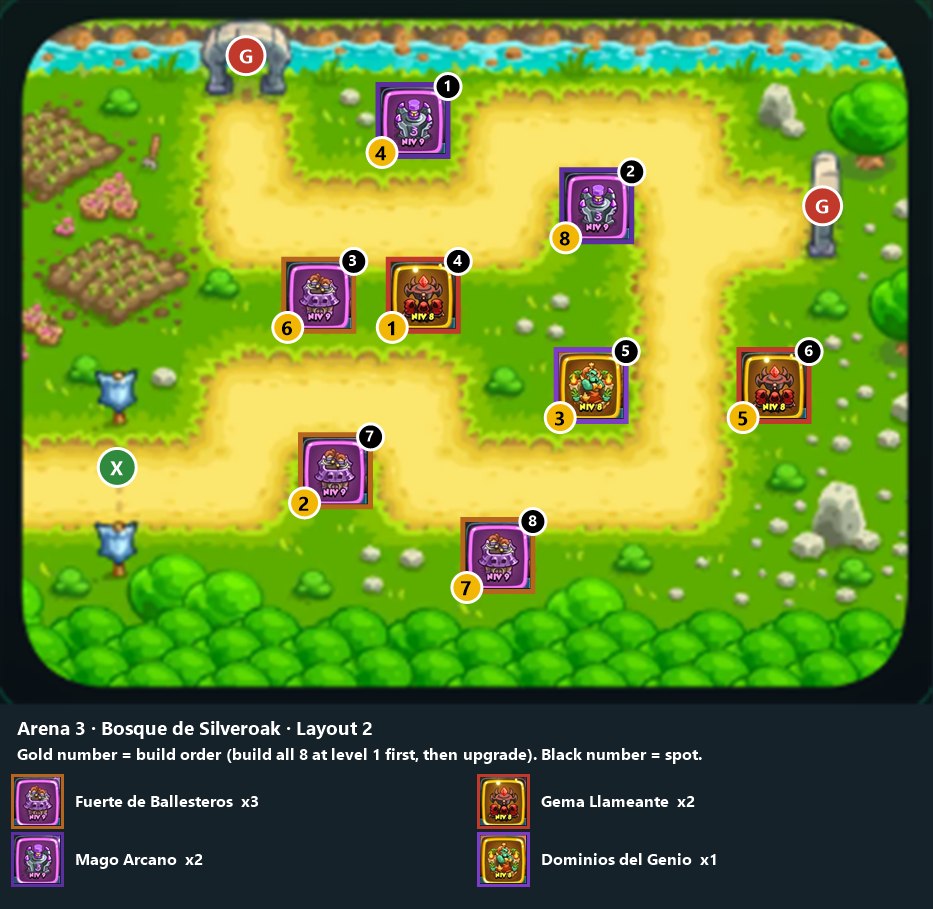 Mago ArcanoMago ArcanoFuerte de BallesterosGema LlameanteDominios del GenioGema LlameanteFuerte de BallesterosFuerte de Ballesteros
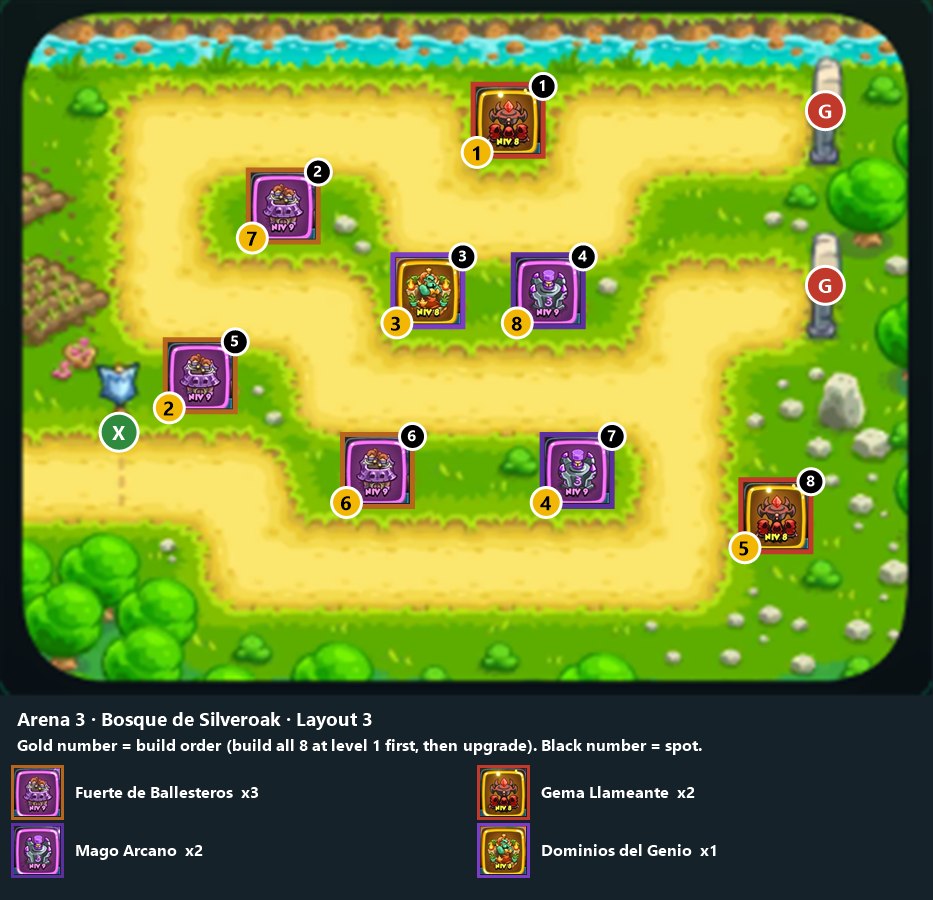 Gema LlameanteFuerte de BallesterosDominios del GenioMago ArcanoFuerte de BallesterosFuerte de BallesterosMago ArcanoGema Llameante
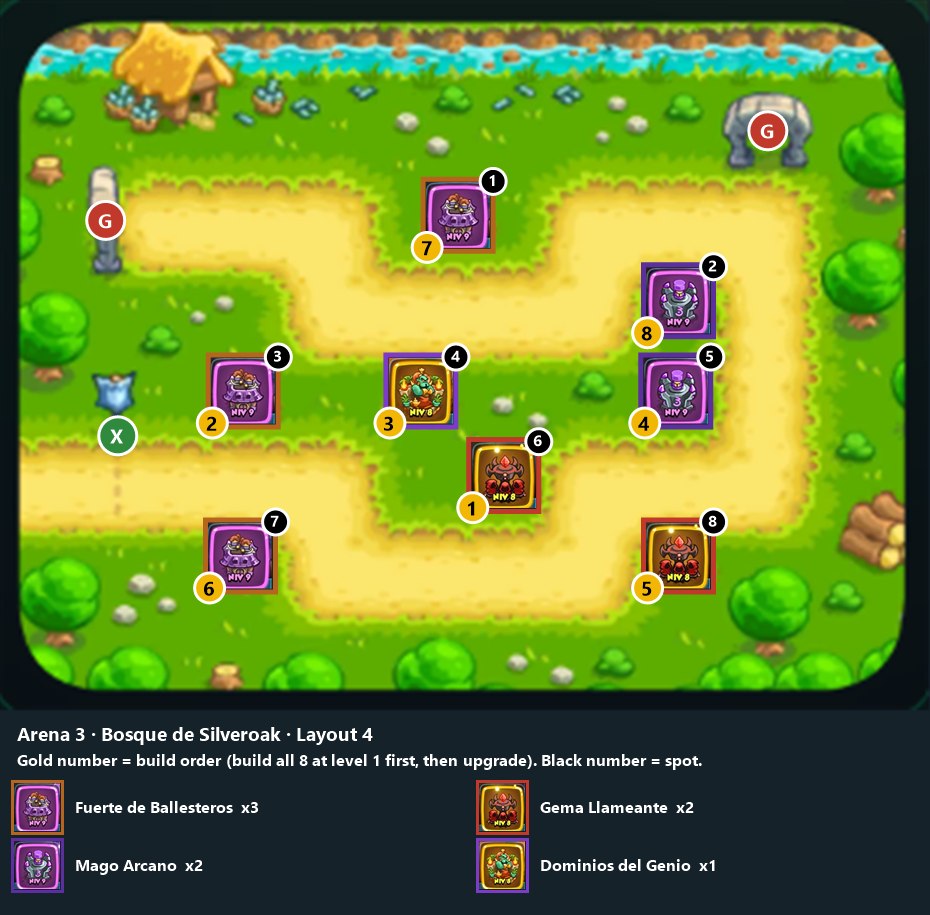 Fuerte de BallesterosMago ArcanoFuerte de BallesterosDominios del GenioMago ArcanoGema LlameanteFuerte de BallesterosGema Llameante
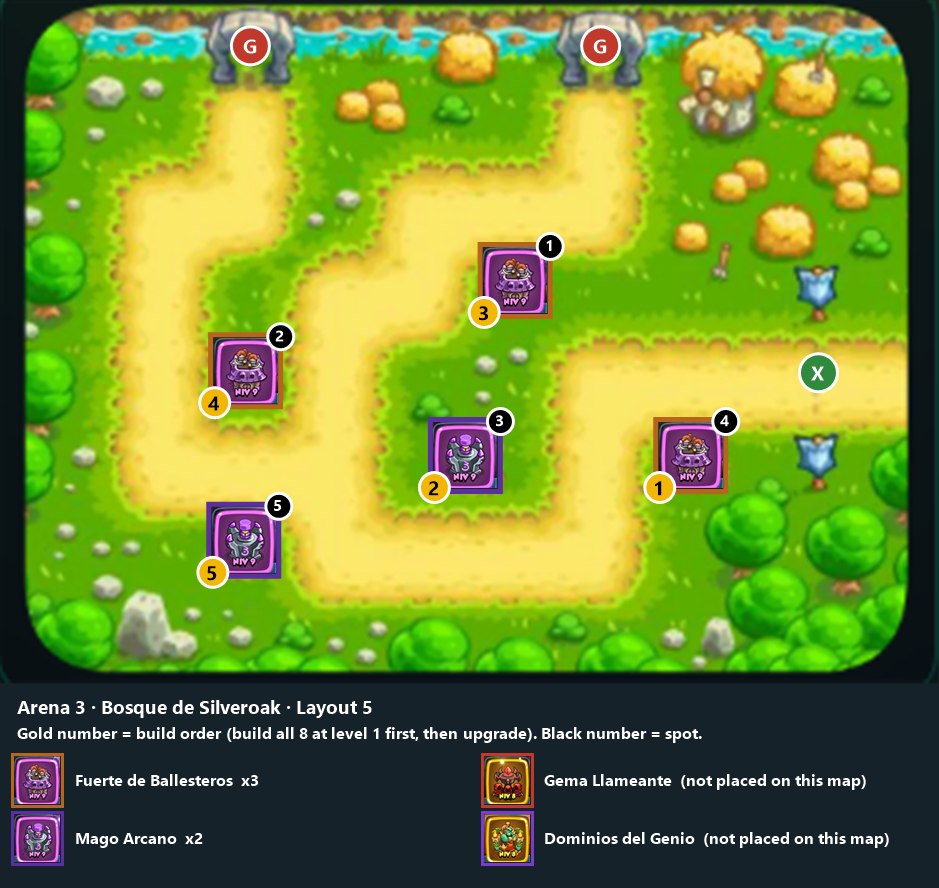 Fuerte de BallesterosFuerte de BallesterosMago ArcanoFuerte de BallesterosMago Arcano
Deck bonuses from these 8 cards.
Resistencia Heroica: +3% hero health (Fuerte de Ballesteros) Fuerza Mágica: +5% damage for magic towers (Gema Llameante) Enfoque de Mana: −2% cooldown for all spells (Gema Llameante) Ira de Maná: +3% damage for all spells (Mago Arcano) Pulso de Aguja: −4% ability cooldowns for all towers (Dominios del Genio) Revivir Heroico: −6% hero respawn time (Dominios del Genio) Asalto Heroico: Hero bonus (?%) (% not shown in your screenshots) (Golpe Definitivo) Concentrar Invocación: −5% cooldown for summoning spells (Ráfaga Solar) Resistencia de Infantería: +7% health for your soldiers and summons (Ráfaga Solar) Pulso de Aguja: −2% ability cooldowns for all towers (Sabotaje) Fuerza de Aguja: +3% damage for all towers (Bonehart) Depleción de invasores: −5% magic armor on enemies (Bonehart)